Sunday, March 5, 2017
Mudroom Final Reveal - one year in the making!
I'm not kidding....this is the smallest room in the house and I've been working on it FOREVER! I'm honestly not even sure exactly why, but the wait is over and now I can finally check it off the good old list and share some pics. The room is very hard to shoot because it doesn't get any light and is very small, but I wanted to post the final product because it took a lot of hard work.
The mudroom is the primary entrance/exit for us so and needed to house mine and Eaphis' coats and all of our shoes. We do have a coat closet between the mudroom and the kitchen, but I turned it into a game/toy closet instead and added some hooks so the boys can hang their coats and easily access them. The walls I painted in Sherwin Williams Aloof Gray, which is one shade darker than the rest of the main floor, because I wanted something that would hide dirt and scuffs a little bit more.
These hooks are one of my absolutely favorite things in the house! They are shaped like Bees and were designed from two of my absolutely favorite bloggers/designers from Young House Love. I bought them from Target before we even moved and hoarded them until I figured out where I wanted to use them. To line the walls I used floor to ceiling beadboard; unlike the bathrooms, this kind is made out of MDF so it's a little bit thicker.
Under the coat hangers, I built a simple farmhouse bench based on these plans from Shanty 2 Chic and painted it in white chalk paint. The baskets below are from Micheals (I got them at the end of the summer for 80% off - so they cost me 15$ total!!!! The stripes were originally magenta, but I took a few hours in front of the TV and painted over them...well worth it to save so much on this size basket). The rug I just picked up from World Market for only $12 (!!!). There's a lot of white in this room, but knowing it would be full of so much stuff on a daily basis (as if you couldn't guess we have more than one coat/scarf/hat hanging up regularly) using so much white keeps it from looking more cluttered.
Up top, I built a very simple floating shelf (again, check out Shanty 2 Chic as they have TONS of floating shelf options) which was sooooooo easy that I will be doing it again and again and again! I printed and framed these awesome vintage inspired posters from NASA that Eaphis found a few years ago - they add the perfect amount of color and the perfect amount of nerdiness.
The light I found at Home Goods (I actually found two of them and put the other one in my upstairs bathroom). I hesitated getting it because I don't have any other brass fixtures in the house, but they were just so perfect - I think they look like old oil lanterns - that I said screw it and just went with my instinct.
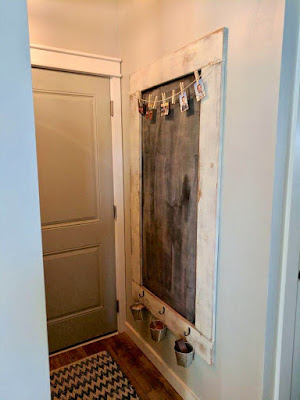
On the opposite wall I have a huge chalkboard that has been up for over a year - in fact the frame on this was actually the first thing I ever built! I used magnetic paint topped with chalk paint - but if I had to do it again I would actually have used a piece of sheet metal painted with the chalk paint. The magnetic paints works somewhat, but you have to have a VERY strong magnet. Also, the little metal buckets that I hung to hold the chalk are cute (and only cost $1 each) but they are very dinged up from getting banged by the door over and over again. The door is painted in Sensible Hue (which is one shade darker than the walls) and is the same color as the inside of the front door. I love the way it looks, but the paint also gets dinged from metal buckets. It's not terrible so until I think of a better solution we'll stick with it.
It's a small room, but it's one of the most used spaces in the house and now it functions the way we need it too. Now time to fill it back up with stuff : )
Subscribe to:
Post Comments (Atom)
PLEASE NOTE: This site contains affiliate links to some of my favorite places to shop....all views and opinions are my own.
-
A Quick Entryway Update With the temperatures outside still pretty frigid I've been using the winter to knock some smaller pro...
-
Since I'm not tackling as many big projects this year, I want to spend some time sharing the smaller touches that make my house feel...


No comments:
Post a Comment